Simple DIY Flower Projects To Try: Materials To Use in Making Flower Gifts
As far as diy mothers day flowers are concerned, it is something unique to make a personal gift and heartfelt. Handmade flowers are not only a show of care, but also permanent. You can make a pleasant outing of a basic crafting session, be it a flower box, a decoration of a centerpiece, or even an inspired gift of love. When you are only beginning to work on DIY flower projects, there are limitless opportunities at your disposal- there is no specialist level required to create something; you only need creativity and the necessary materials.
Some of the materials that you will require for DIY flower projects are as follows.
It is important to first collect the appropriate materials before getting into the crafting business. It is at this point that the magic starts. The following list will be required to start:
Paper Flowers: Simple, cheap and bespoke. You may apply different kinds of paper, such as crepe, tissue paper, or even old magazines, to make them pop.
Fabric Flowers: Drapey, voluptuous, alive. You may work with cotton, felt, or even denim to make it more rustic.
Floral Tape and Wire: It is necessary to shape the flowers and hold the stems.
Hot Glue Gun: The best material to use in gluing your flowers together.
Paint: To add a spot of colour, particularly when you are working with paper flowers, or you are painting the petals on cloth flowers.
Scissors & Crafting Knife: This is ideal for making precise cuts, especially in flower petals that feature a lot of detail.
Embellishments, Ribbon, and Decorative: To provide an added touch that will make your work that much more special.
You are now prepared to begin your DIY flowers!
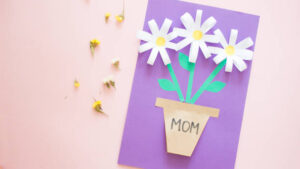
Easy Bouquet of Paper Flowers for Amateurs.
The best place to start is to make a paper flower bouquet. It is very easy to use, but in addition, you can make it match any occasion. This is the way you can make your own bouquet:
Step-by-Step:
Selection of Your Paper: First of all, select your favorite paper. Vibrant colors and patterns are well done using craft or scrapbook paper, and it gives a delicate touch using tissue paper. Choose two or three colors so as to bring out an active appearance.
Cut Petals: Cut the paper into a circle or oval, according to the kind of flower you desire. For a rose, use round shapes. For daisies, oval works well. The larger the petals, the larger the size of your flowers.
Fold the Petals: This is optional, but it helps them to look more like a rose. Take the edges of your petals and curl them in either with a pencil or the edge of a scissor.
Assemble the Flower: One should begin with a smaller petal in the center and glue the layers on it. Overlay the coverlets to an extent, creating a natural appearance. Continue until you attain the size and fullness that you want.

Add a Stem: Use floral wire or floral tape to make the stem of your preferred length. Stick the flower with the wire with the help of hot glue.
Make a Bouquet: When you have made a number of flowers, put the bunch of them together. You can also put a ribbon on them, and there you are, an excellent DIY paper flower bouquet!
This is just the beginning! Paper flowers are so beautiful because they can be mixed and matched with colors, and the leaves can be added, or even glitter can be added to the flower to make it sparkle.
Fabric Flowers: Textile Feathers.
Fabric flowers provide some extra touch and a gentle touch. They are slightly higher than paper flowers, yet still simple enough to be used by an amateur who wants to include some classy details in his or her DIY projects. The following is a basic fabric flower project:
Step-by-Step:
Select Your Fabric: Select a fabric such as felt, cotton, or even an old t-shirt. You will need a pair of scissors to make the fabric look like a petal.
Cut the Petals: You may cut the petals in any shape,–round, oval, or even pointed, as you may wish to make the flower of this kind.
Shaping the Fabric: Fold the petals of the fabric in a small manner using a hot glue gun. You may also burn the edges using the flame of a candle so that the flowers appear more realistic, e.g., poppies and roses.
Prepare the Flower: The petals need to be spread with glue one by one. A button or bead in the middle will just make your flower pop.
Add a Stem: Add a stem of a green pipe cleaner or floral wire. Floral tape is used to hold the flower by wrapping the base.
The fabric flowers can be used in wreaths, hair decorations, or as a component of a greater floral composition. They are stronger than paper flowers and may be stored as a souvenir for years to come.
Home Decoration: Wreaths of flowers.
Wreaths are not only to be used on holidays but also a great DIY task to be done on any occasion, not to mention Mother’s Day. Simple flower wreaths can easily be made using either paper or fabric flowers, and add a rustic feel to any room. These are the simplest steps to follow:
Step-by-Step:
Make the Base: begin with a wreath. Wire wreaths can be purchased in the form of a ready-made wreath at the majority of craft stores, or you can create your own using a cardboard circle.

Prepare Your Flowers: It doesn’t matter which flowers you have; either paper or fabric, be sure they are all ready to go. You may keep the flowers small as well to create a delicate appearance, or you may keep them large to create a bold appearance.
Arrange the Flowers: Start applying the hot glue gun to glue the flowers to the wreath shape. Begin at the top with the flowers and go down at the bottom, and so layer the flowers so that they overlap each other a little.